The Recovery Reports view is your own record of every disaster-recovery operation Zerto has run for your service: failover tests, live failovers and moves. Each one shows the result, how long recovery took against your target, and a step-by-step breakdown of what happened. Every report can be downloaded as a polished PDF, ready to hand to an auditor or attach to a DR runbook.
Where to find it. In the left menu open Services → Zerto → Recovery Reports (web address /app/main/services/zerto/recovery-reports). The list is read straight from Zerto and is scoped to your own organisations (ZORGs), so you only ever see your own recovery activity, never anyone else's.
Why this view matters
Proving that your disaster-recovery plan actually works is a routine part of most compliance regimes. Standards such as ISO 27001, and many customer audits, ask you to show that recovery has been tested regularly and that it met the recovery times you committed to. Recovery Reports keeps that evidence in one place, with the achieved recovery time recorded against every test and failover, so you are not hunting through emails or screenshots when the auditor asks.
- Failover test - a rehearsal. Zerto brings up a temporary copy of your protected machines at the recovery site to prove they would start cleanly, without touching your live environment.
- Live failover - the real thing. Your workloads are recovered at the recovery site because the protected site is unavailable or you have chosen to run there.
- Move - a planned migration of workloads from one site to the other, run in an orderly way rather than as an emergency.
- RTO (Recovery Time Objective) - how long recovery actually took, shown as a duration. It is the headline figure most auditors look for: it answers "how quickly were we back up?".
The Recovery Reports list
The view lists your recovery operations, one per row, with the most recent at the top. At the top of the page are a search box, a date-range control, and filters for operation type and result, plus an Export to Excel button. The search matches the VPG name and the operation type, so you can quickly narrow to a single group or a single kind of operation.
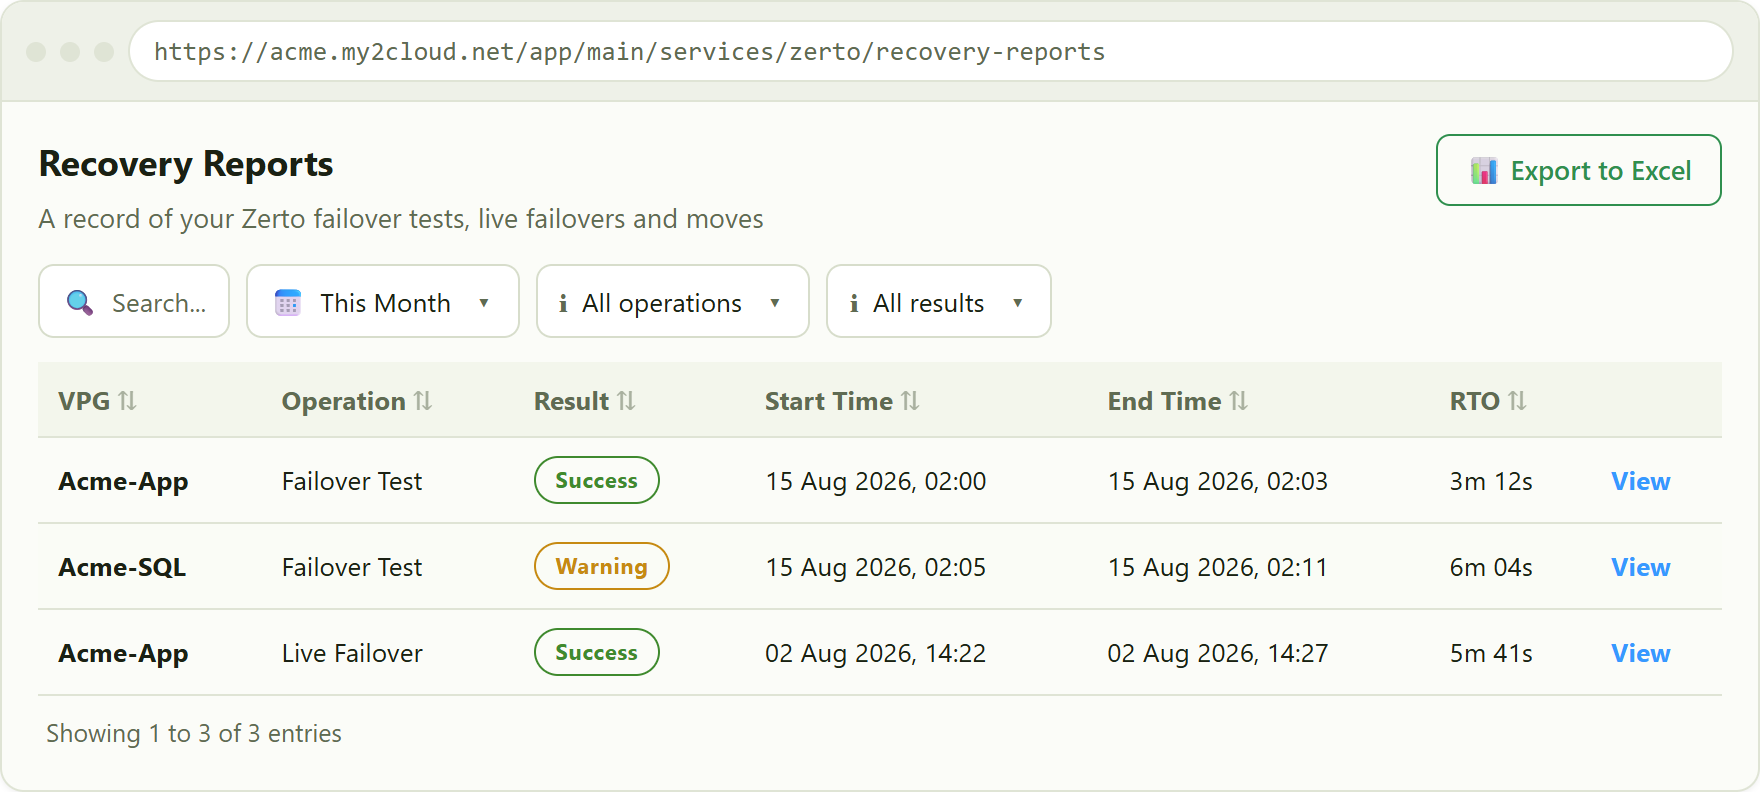
the Recovery Reports list. The Result pill is green for success, amber for a warning, red for a failure; the RTO column shows how long each recovery actually took.
What each column means
- VPG - the Virtual Protection Group the operation was run against (the group of machines recovered together).
- Operation - the kind of recovery: a Failover Test, a Live Failover or a Move.
- Result - the outcome, shown as a coloured pill: Success when everything came up cleanly, Warning when it completed but with something worth noting, and Failure when it did not complete.
- Start Time and End Time - when the operation began and finished.
- RTO - the recovery time actually achieved, shown as a duration such as
3m 12s. This is the elapsed time from start to a recovered, running workload.
Click View on any row to open the full report for that operation.
The report detail pop-up
Opening a report shows you exactly what happened during the test or failover and where the time went. Along the top is the achieved RTO alongside the result and the VPG, then a list of the individual recovery steps Zerto carried out, each with its own timing. Reading down the steps you can see which part of recovery took the longest, which is useful both for reassurance and for spotting where a slow step could be improved.
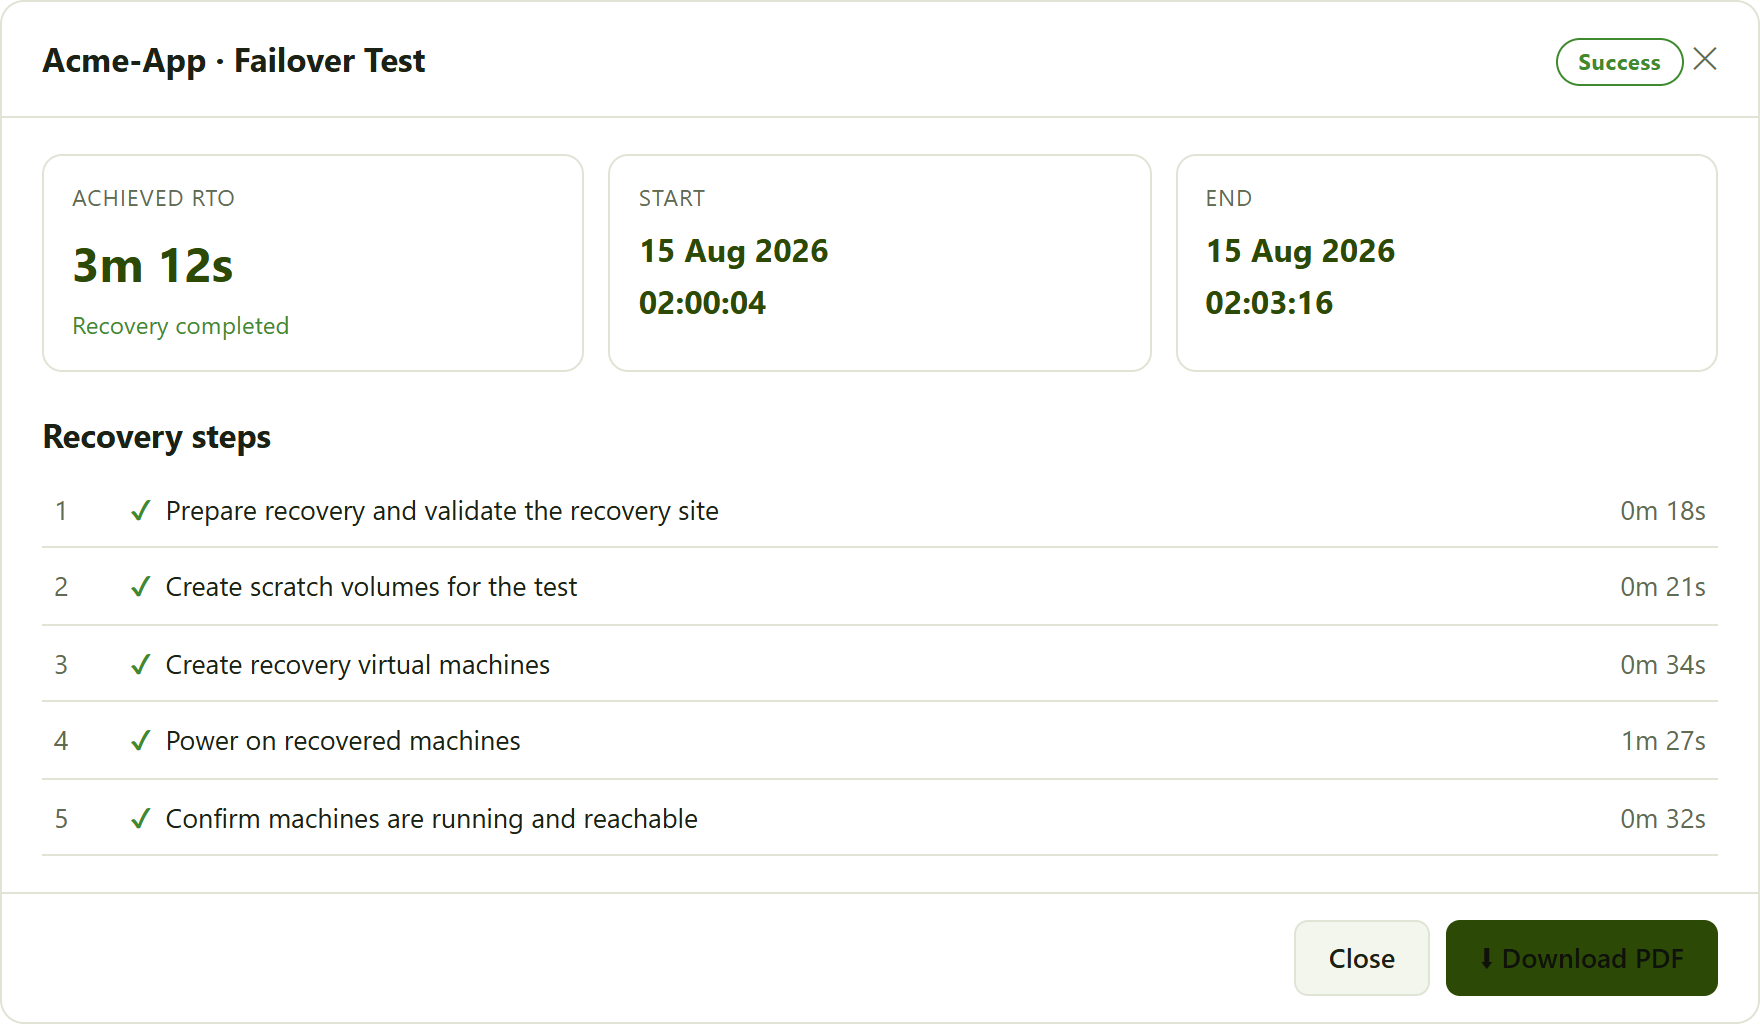
the report detail pop-up. The tiles show the achieved RTO with the start and end times; the steps below show where the recovery time went. Download PDF produces a formal, shareable report.
Downloading the PDF
Each report can be downloaded as a PDF using the button in the pop-up footer. The portal renders the document itself, in the Assurestor house style, so it comes out as a clean, formal recovery report rather than a raw data dump. It carries the VPG, the operation type and result, the start and end times, the achieved RTO and the full list of recovery steps with their timings.
This is the version to keep as evidence. It is well suited to attaching to a change record, filing against an audit control, or including in a DR runbook sign-off, and it is easy to share with an auditor or a colleague who does not have portal access.
Good practice. After each scheduled DR test, download the PDF and file it with your compliance records. Because the achieved RTO is printed on the report, you have dated proof that recovery was tested and met your target, all in one document.
Filtering and exporting the list
The controls at the top of the list let you find the reports you need:
- Search - type part of a VPG name or an operation type to narrow the list as you type.
- Date range - limit the list to a period, for example This Month or a custom range, which is handy when preparing evidence for a specific audit window.
- Operation - show only failover tests, only live failovers, or only moves.
- Result - show only successes, warnings or failures, for example to review anything that did not come up cleanly.
Export to Excel downloads the list exactly as you have it on screen, keeping your current filters and sort order, which is useful for a summary across many operations. For a single operation you want to keep or share formally, use the per-report Download PDF instead.
Asking Mia
If you would rather just ask, Mia can summarise your recent recovery activity for you. Questions such as "have my DR tests passed recently?" return a short, plain-English answer drawn from the same recovery records, so you can get a quick read without opening the view yourself.
Tips
- Sort by Start Time (newest first) to confirm your most recent scheduled test ran, then open it to check the result and RTO.
- Filter Result to Warning or Failure to review anything that did not complete cleanly, then open the report to see which step is responsible.
- Set the date range to your audit period, then download each PDF, so your evidence pack matches the window the auditor is asking about.
- The achieved RTO is recorded on every report, so you can show not just that recovery was tested but that it met your target time.
- A Warning result does not always mean a failure to recover: it often flags something worth noting, such as a step that took longer than usual. Open the report and read the steps to see what it was.
Was this article helpful?
That’s Great!
Thank you for your feedback
Sorry! We couldn't be helpful
Thank you for your feedback
Feedback sent
We appreciate your effort and will try to fix the article